![]()
![]()
![]()
![]()
|
|
|
|
|
The next step is to rotate the images into the standard short axis orientation, see Standard Reorientation of the Heart. An automatic procedure is available, but when it fails a manual interaction is required.
Manual Reslicing
As soon as the averaging process has completed, the display shows the MYOCARDIUM images and is switched into the reslicing mode.
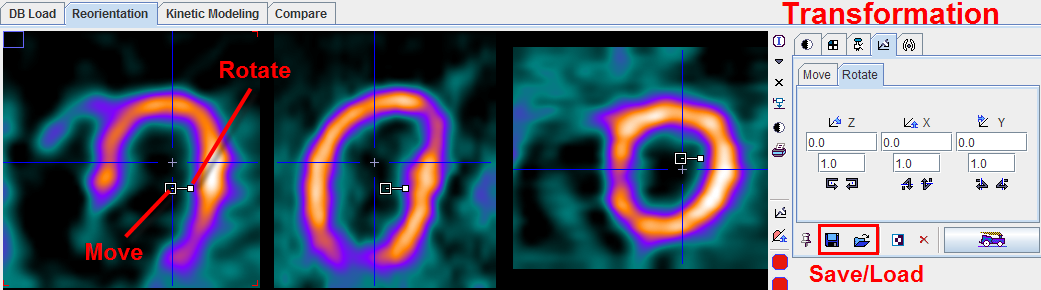
The button  provides a quick way to bring the images into an approximate short-axis orientation. The fine-adjustment can then be done using the handles which are shown in each of the orthogonal slices:
As an alternative to the mouse-operated reslicing numerical values can be entered on the Move and Rotate tabs. If anything goes wrong the transformation can be reset with the ![]() button.
button.
Once the right orientation has been found it is recommended to exit the reslicing mode in order to avoid unintended manipulations of the orientation. To this end, select any other tab such as the image presentation tab  .
.
Automatic Reslicing
The PCARDP tool offers an automatic procedure for the short axis reorientation. As soon as the button indicated below is activated the procedure is started.
The images are reoriented, and the resulting parameters shown in the reslicing tab. The box next to the reorientation button is for enabling the automatic mode. If it is checked, the reorientation process is started as soon as anatomical images are generated or loaded.
The arrow below the box can be used to copy the short axis transformation from rest to stress, and vice versa. If the transformation is copied, the target images are immediately resliced. Note that due to patient motion between the studies the copied transformation may not be fully adequate. In this case please fine-tune manually using the handles as described in Manual Reslicing above.
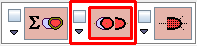
If the automatic reorientation returns an inadequate result, it can be supported by manually defining the left ventricle using a marker. Please proceed as follows:
 button indicated above.
 button, and click into the LV. A marker appears as illustrated below.
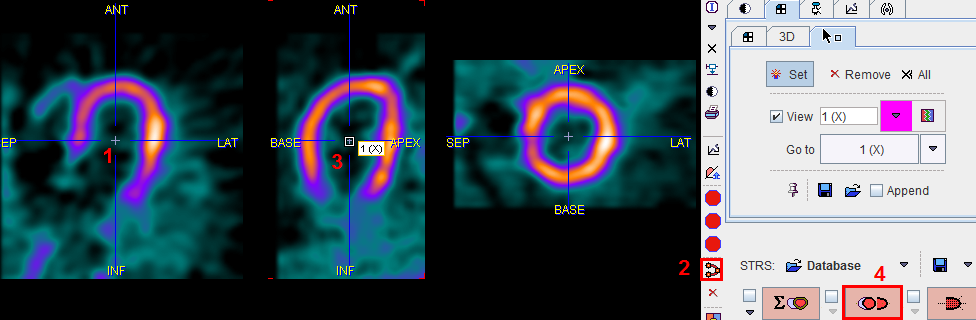
Correct Short Axis Orientation after Reslicing
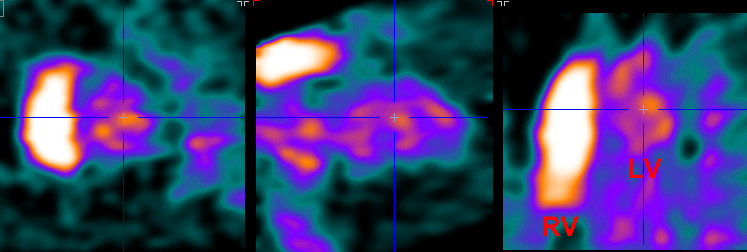
Please verify, that after the automatic and/or manual reorientation the images are oriented as illustrated below:
For the automatic contouring and the subsequent segmentation it is very important that the septum appears to the left in the SA slice. This can be verified by checking the right ventricle in the BLOOD images, which are also shown with the same transformation parameters. For the automatic contouring it is also helpful if the heart is centered in the center of the image volume.
Standard Cardiological Report Page
As soon as the images are properly SA reoriented, a myocardium Stress-Rest comparison report can be generated using the report button located left to the Modelling TACs button.

The report layout is organized in three main sections: the upper section shows 14 slices in SA orientation of the Stress study and the corresponding slices of the Rest study; the middle section displays the 7 Stress and Rest slices in vertical long axis orientation; the bottom section shows 7 Stress and the corresponding Rest slices in the horizontal long axes orientation.

As usual, the report can be annotated, printed or captured in different formats and sizes.