![]()
![]()
![]()
![]()
|
|
|
|
|
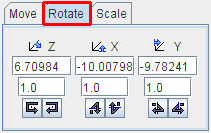
To calculate slices at oblique orientations or rotate images the reslicing pane must be activated. Reslicing is defined by a transformation consisting of translations in all directions, rotations about all axes, and potentially scaling along the axes. Each of these transformation components has its own sub-pane.
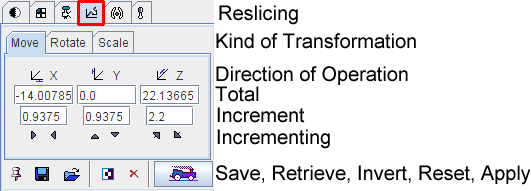
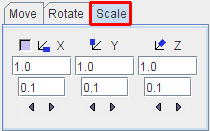
Note that Scale values of 1 indicate that the pixels sizes read from the image header are correct. Any other number will scale the pixel size accordingly.
The transformation parameters can be specified in different ways, on the corresponding sub-panes Move, Rotate, Scale:
After changing the transformation, new slice images are immediately calculated and shown. However, the entire data set is only generated when needed, for instance to save the images. The ![]() button serves for enforcing the reslicing process for the whole data volume.
button serves for enforcing the reslicing process for the whole data volume.
The ![]() button resets the transformation parameters. A transformation can be saved to disk using
button resets the transformation parameters. A transformation can be saved to disk using ![]() , and later retrieved with
, and later retrieved with ![]() if needed.
if needed.
Note: These manual transformations are not fully equivalent with the automatic rigid matching transforms of the fusion tool. Manual transforms can be used as rigid transforms in PFUS, but the reverse is not possible.
Mouse-driven Reslicing
As soon as the reslicing pane is activated, handles appear in the image overlay. They allow for interactive, mouse-driven reslicing.
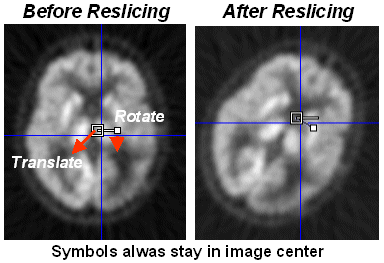
Translation: Move the mouse pointer to the open white rectangle. The cursor changes to  . Click the left mouse button down, and then drag along the direction you want to move the image to.
Rotation: Move the mouse pointer to the filled small white rectangle. The cursor changes to  . Click the left mouse button down, and then drag while the image gets rotated. To get finer control of rotation, the rectangle can first be dragged radially outward, so that the handle distance from center increases.
Per default, the reslicing handles are shown as long as the reslicing tab is selected. If another tab is selected, they disappear. To make them appear permanently in the images and enable mouse-driven reslicing at all times, the pin button ![]() can be fixed to
can be fixed to  . A quick alternative to show/hide the reslicing controls in the active image is the CTRL+R shortcut.