![]()
![]()
![]()
![]()
|
|
|
|
|
The principle in the Brain Norm editor is to work from top to bottom following the numbered user interface elements.
1. Create empty Brain Norm
Activate the Create New Norm button. In the appearing dialog select the PMOD database in which the Brain Norm definition will be saved,

enter a name into the Enter name field, and activate the Create new Brain Norm entry button for creating an empty new Brain Norm definition. Note the Norm Description text field which allows adding explanatory comments to the definition.
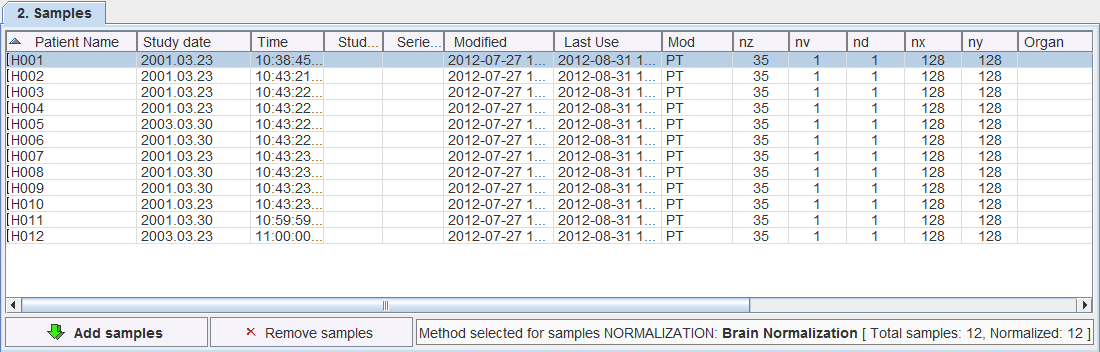
2. Add Control Samples
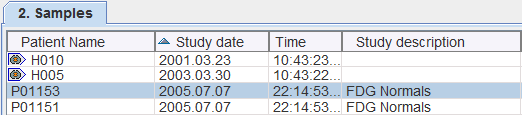
The button Add samples brings up a database selection dialog window. In this window bring one or more image sets of normal controls into the Selected for loading area and confirm with the Set series button. The samples are then listed in the 2. Samples section.
3. Specify Normalization Template and Normalize Samples
The stereotactic normalization to be used for the database is defined on the 3. Spatial Normalization tab.

The Template selection serves for defining the template image which will be the reference for normalizing to the stereotactic anatomy. It offers the choice of the PET and SPECT MNI templates, as well as a User defined entry for using custom templates. With User defined please use the  button to select the template image, which must be available in the database. For new tracers, the user may first have to generate a suitable template outside the PNEURO tool and import it into the database.
A mask is required to cut off signal from outside the brain during the normalization. It is specified using the Mask selection. For the standard PET and SPECT templates there are default masks available, for User defined templates the user has to select an appropriate mask series in the database.
The Method selection allows choosing the method applied for the stereotactic normalization. It is recommended using Brain Normalization, but an older version is still available for compatibility purposes.
To the right of the method, its parameters are available for editing. Because the normalization template is typically a relatively smooth image, some smoothing of the target image is needed to make it more similar to the template. To this end a Gaussian smoothing filter may be defined by its full width at half maximum in all directions (x,y,z). Based on the smoothing, the Sampling rate is determined. Alternatively, Gaussian smoothing can be disabled and a dedicated Sampling rate specified. The specified Frequency cutoff (default = 25) is used for calculating the number of basis functions. Higher cutoff values result in fewer basis functions.
After the normalization method has been fully specified, the samples in the list can be selected and normalization started with the Normalize Selected button.
The normalization is performed in the background, and finally confirmed by a message. The normalized images are saved in the database as new series of the controls, labeled with NORMALIZED in the series description. Although smoothing is applied during the process of normalization, the NORMALIZED images are not smoothed. Sample images which have been normalized are marked in the Samples list with the ![]() symbol.
symbol.
When creating a Brain Norm it is important to ensure that only correctly normalized samples without truncated areas are included. Although a certain inaccuracy of the mapping from the patient anatomy to the stereotactic template cannot be avoided, samples showing gross deviations should be excluded from the analysis.
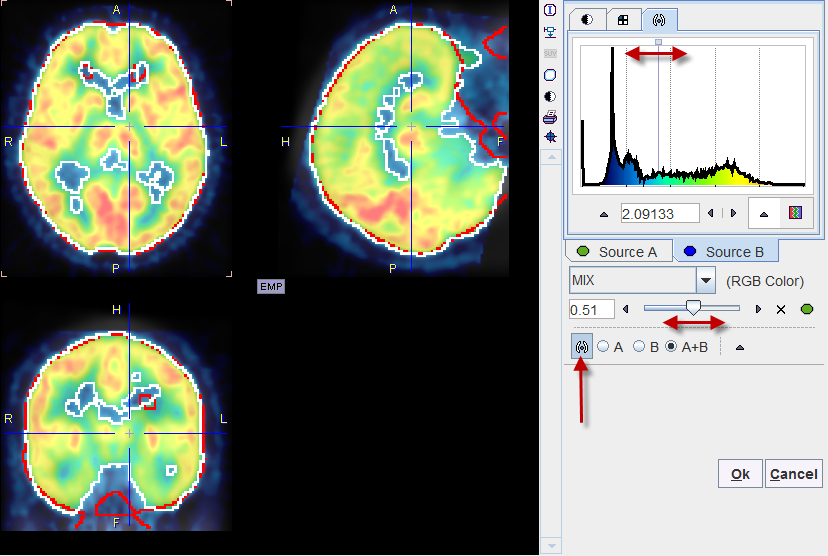
A fusion display supporting the quality control of spatial normalization is integrated in the Edit Norm tool. When the Preview box is checked and the Validate Normalized tab is selected, the image display shows a fusion of the template with the normalized sample image.
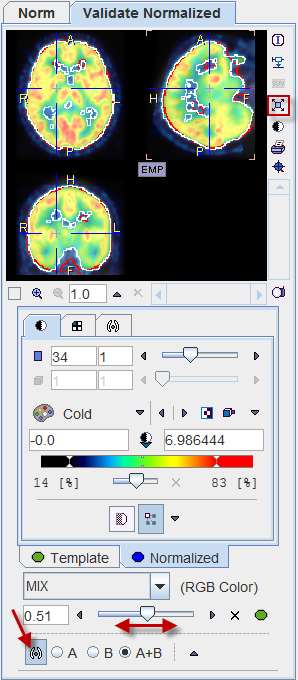
The tabs allow switching between the Template and Normalized images, for example to adjust the color tables or to define the iso-contour level. The relative contribution of the two components to the fusion image is governed by the fusion balance slider.
The easiest way to quickly check all normalized samples in the database is to switch to the orthogonal view of the Validate Normalized tab, select the first entry in the 2. Samples list, and with the ARROW DOWN keyboard key browse through the list entries. Each time a new sample is selected the view gets updated.
For a detailed analysis the fusion display can be blown up using the large view button indicated above.
4. Define and Calculate the Database
The database properties are defined on the 4. Norm Calculation tab.

A Gaussian smoothing filter is available for smoothing the normalized control images before the database calculations.
In order to perform a pooled analysis it is required that the control images have comparable pixel values. In most cases the image values must therefore be scaled. This is achieved by dividing the pixel values by the average value in a stable reference tissue. Several user interface elements in the Scale Values to line allow flexible scaling strategies.

The first selection lets define how the reference value is calculated within a spatial domain defined by the second selection. The calculation choices are:
Aver |
Average value in the reference pixels. |
Max |
Maximal value in the reference pixels. |
Aver above % of Max |
Average of those pixels which are above the entered percentage of the maximum. |
Aver in percentile range |
A pixel value histogram is calculated, and the average value in the specified percentile range calculated. The setting in the example above only considers grey matter pixels which are in the 40% to 90% percentile range. This may represent an approach for excluding diseased hypometabolic (low values) and activated (highest values) pixels. The View Percentile Mask provides a visualization of the pixels which are used for calculating the reference value. As soon as it is activated, the currently selected sample is analyzed and the pixels shown which qualify for the criterion. |
The spatial domain choices are:
VOI |
A volume-of-interest which can be selected in the database. |
Mask |
A binary mask file which can be selected in the database. |
Normalized Sample |
No restriction, all data pixels are used. |
In the example shown above the average is calculated of all pixels of a gray matter probability mask with p>0.5.
Finally, the database needs to be calculated with the Norm Calculation button. The following processing steps are performed:
As a result, the average value (representing the expected normal value) and the standard deviation (a measure of uncertainty) are known per pixel. These results are saved in the database as new image series of the normalization template study and marked in the description as MEAN and STDV.
5. Define Comparison Filters
The patient images which are to be compared against the Brain Norm are also first normalized. The smoothing filter during this normalization may differ from the filter applied to the control image normalization and can be specified with the Normalization Gaussian Smoothing values.
Due to the pooling of many samples and some optional filtering, the database is inherently smoothed. Therefore, some smoothing of the normalized patient images is most likely required to reduce disturbing edge artifacts. This smoothing can be specified with Z-Score Gaussian Smoothing values.

The Statistics in VOI facility allows to specify a VOI set for calculating regional statistics in the resulting z-score map. These VOIs have to be prepared in the normal space, and can be selected using the button. Hint: An easy way to generate a comprehensive VOI set is to save an outline result from one of the VOI outlining modules in PNEURO.
6. Define the Variance used for z-Score Calculation
When a normalized patient image is compared against the Brain Norm, a z-score value is calculated in each image pixel. This operation requires the standard deviation of the normalized values across the controls data sets. If the number of control samples is low, the statistical power may not be sufficient for calculating reliable standard deviations in each individual pixel. In this case Variance Pooling on the 6. Variance Pooling tab should be enabled.

With this setting the user needs to define a spatial domain, within which the pixel standard deviations are averaged to derive a pooled standard deviation which will be used for all pixels. A VOI, a Mask, or the whole Normalized sample can be employed for variance pooling.
Note: After changing the Variance Pooling method the database has to be recalculated with the Norm Calculation button.
7. Define Result Mask
Finally, a Result Mask may be defined outside which the calculation results are cleared because they are meaningless. This definition is available on the 7. Result Masking tab, and a VOI or a Mask can be employed.

8. Save Brain Norm
The last step after the Brain Norm has been calculated and the comparison parameters have been set is saving with the Save Norm button. Save as serves for saving variants of the Brain Norm with different comparison strategies under different names.
Note: New samples can incrementally be added. In this case, and if one of the definitions has been modified, it is required to recalculate and save the Brain Norm.